2/27/09

SQL Data Services (SDS) Tutorial (Part2)

This blog entry is the second part of the SQL Data Services (SDS) Tutorial.

This article is based on CTP release of SQL Data Services.

Let's get us started. You begin by opening "SDS Exlorer" from Windows Start menu.

First of all, delete the text in Query text area so that you can disregard Query stuff for now. (I will discuss Query in future)

Next, set the address to
https://[your_authority].data.database.windows.net/v1/
where [your_authority] is the actual authority id yours (read Part 1 of this Tutoria if you don't have one). In this example, I use my test authority called "yoshi".


Then, click "Get" button.


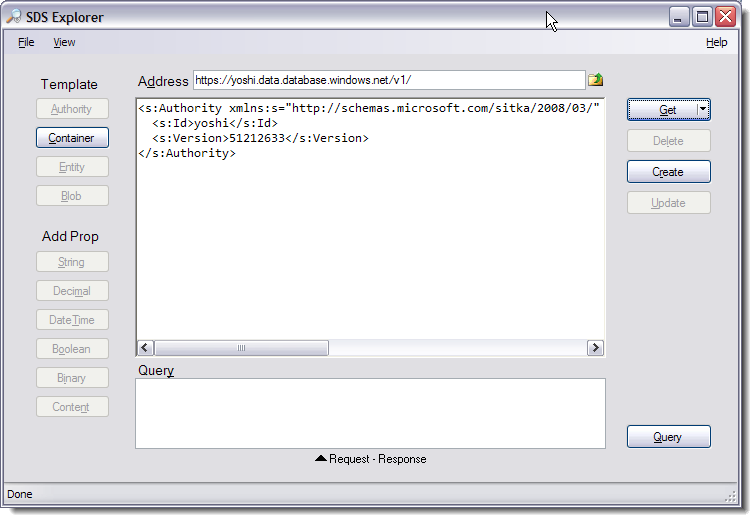
You receive information about your Authority (if you get alot more information that what I got above, don't worry. Its called "metirics metadata" and we will cover this later)

Now, without changing the value in Address, click "Query" button.


This time, you receive an XML element called "EntitySet" with nothing in it. This measn that your Authority is empty. In order to make this Authority useful, we need to add a Container. Let's do that.

Without changing the Address, Click "Container" button. You will get a template in the main text area. SDS Explorer generated GUID value for you as Id of the new Container, which is about to be created. I changed this to "bookmarks" because that's the application I want to build.


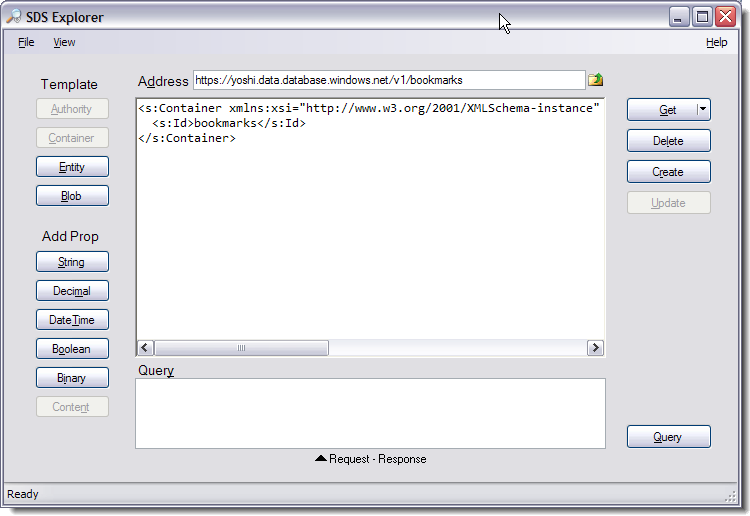
When you are happy with the name of Container, click "Create" button.

As usual, it is not appearent if the requst succeeded or not, so open the "Request/Response" window and check HTTP "Response".


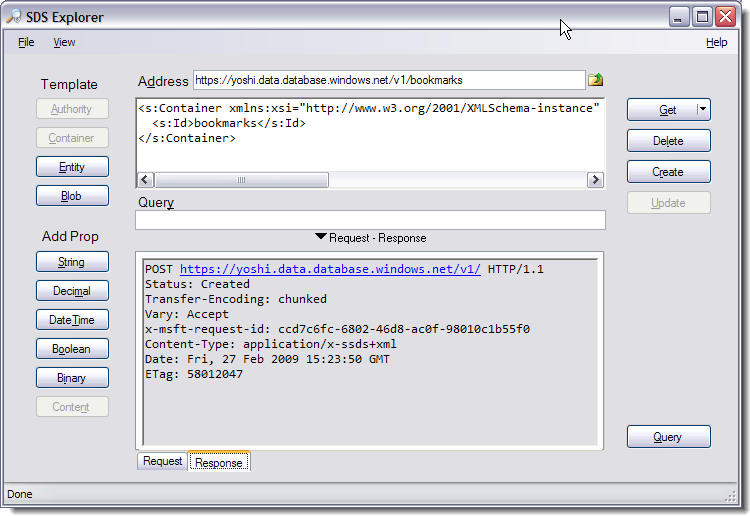
The status says "Created" so that's a good sign!

Now, let's talk about an important concept called "Scope" in SDS. If you look at the Address bar right now, you see:

https://yoshi.data.database.windows.net/v1/bookmarks

This is in the format of:

https:[your authority id].data.database.windows.net/v1/[your container id]
... and you are in "container scope".

Understanding "Scope" is important because all operations you perform using SDS Explorer works within the context of the current Scope. For example, if you make a simple HTTP GET request while Authority is the scope, you will get metadata information about the Authority; while Container is the scope, you will get metadata information about the Container.

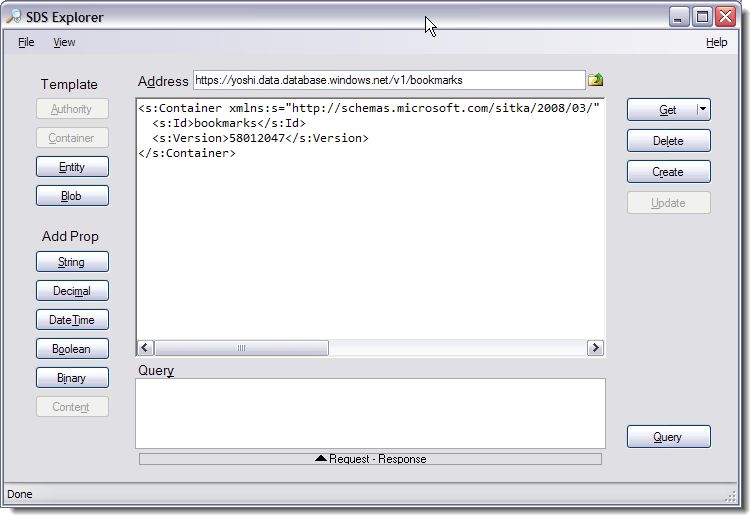
Take a look at the output results of clicking "Get" and "Query" buttons while we are in bookmarks container scope.

Result of "Get":


Result of "Query":


You observe some metadata information about my "bookmarks" container, and my container is still empty because I haven't added anything. We will cover working with Container in future. For now, let's validate that our Authority indeed contains my newly created container.

Go back to Authority scope by either clicking on "Go up" button (looks like a folder icon) in Address bar or manually type in:

https://yoshi.data.database.windows.net/v1/

And then click "Query" button.


This time, we get EntitySet with one element called Container. This container is the "bookmarks" container that I just created.

You have successfully created a Container and now you can do a lot of things with it. I will talk about working with Container in future.

2/25/09

SQL Data Services (SDS) Tutorial

This blog entry is for you if you are new to SQL Data Services and want to get started.

This article is based on CTP release of SQL Data Services.

I assume that you have:
SQL Data Services account
SQL Data Services SDK installed on your machine

When you start SDS Explorer from Windows "Start" menu, it looks like this.


Without doing anything, just click "Query" button at the lower right corner.

You will receive a popup window asking User and Password.


For User field, provide the solution name you specified while you were signing up for SDS. You should have also received a password at the same time. Once you get passed authentication, SDS Explorer will tell you that it is "working...", and moment later you should see this.


Your output may be different from what I have here, but the idea is the same and simple: you get listing of all of the "Authorities" under "Service" that you have permissions to access.

You can create as many Autorities as you want, but you cannot delete them (I am not sure if this is a limitation during CTP or permanent policy).

Next, let's create a new Authority.

Click "Authority" button, which is one of the buttons under "Template" label, which will give you this screen:


At this momenty, you haven't done anything to SDS data center. You are simply preparing for a request to create a new authority. Notice that SDS Explorer generated a GUID value for you as Id of the new authority. You could use this GUID or specify something more user friendly. For example:


I changed the Id value to "yoshi" (Note. I have not confirmed this but it appears that Authority Id must be unique within the global namespace. My attemp to create Authority with typical id values like "testauthority" and "authorityexample" fails).

What you are doing here is to define a XML payload which will be sent to the server using HTTP POST request, which we will see next.

Once you are happy with the name of the new Authority, click on "Create" button.

Now you have successfully created a new Authority. Unfortunatley, SDS Explorer doesn't make it obvious that the operation succeeded. In order to get a positive confirmation, you should check the HTTP Request/Response data, which is available in a small window that shows up by clicking "Request - Response" button toward the bottom.


The "Request" tab shows you that in order to create a new Authority, SDS Explorer made a HTTP POST request against the "Service"

POST https://data.database.windows.net/v1/ HTTP/1.1

It passed XML payload that act as input for this operation

<?xml version="1.0" encoding="utf-8"?>
<s:Authority xmlns:xsi="http://www.w3.org/2001/XMLSchema-instance"
xmlns:x="http://www.w3.org/2001/XMLSchema"
xmlns:s="http://schemas.microsoft.com/sitka/2008/03/">
<s:Id>yoshi</s:Id>
</s:Authority>

And the "Response" tab shows that the server successfully created the Authority.

POST https://data.database.windows.net/v1/ HTTP/1.1
Status: Created

Now, lets check to see if we will see our new Authority in the list of Authorities available under this Service. You can use the folder-looking icon of Address bar to "go up one level".

While the address bar contains value

https://data.database.windows.net/v1/

Click on "Query" button. You should see this now.


My new Authority called "yoshi" is now available.

I will write more tutorial on this subject later but with this article, you have seen some of the essential SDS concepts:
* SDS Explorer is a handy tool to work with SDS
* You can Query againt https://data.database.windows.net/v1/">https://data.database.windows.net/v1/ to retrieve listing of Authorities
* You can add your Authority by making HTTP POST request with XML payload (this pattern is called REST)

2/9/09

StringBuilder.AppendFormat vs String.Format

I am a bit ashamed of not knowing this until now…

String.Format()

Actaully creates an instance of StringBuilder and delegates all its formatting work to AppendFormat() method to the StringBuilder

So, the following is bad coding:

// creates a string that looks like “item=abc,item=xyz,”
StringBuilder sb = new StringBuilder();
foreach(object obj in myCollection)
{
sb.Append(string.Foramt(“item={0},”, obj));
}

If this loops 1000 times, 1000 StringBuilder instances will be created (calls ctor, allocates memory from managed heap, etc) in the loop

Instead, something like below would be more efficient

StringBuilder sb = new StringBuilder();
foreach(object obj in myCollection)
{
sb.ApppendFormat(“item={0},”, obj);
}

This uses only one instance of StringBuilder

From now on, you will see me using StringBuilder.AppendFormat more, except simpler cases (because one line of String.Format is still more readable!)

2/4/09

You shouldn't blog when your last post is one year ago

Wow, my last post was over a year ago...

Writing blogs require such energy and these days you get to say what you want to say mostly in Facebook and Mixi (my other Japanese only SNS).

Oh well...

This blog on blogger is meant for "tech" related posts - I don't want to discuss these stuff with my Japanese friends who are not interested in tech stuff and also they don't read English! Facebook is for English-speaking friends but FB is just not the kind of place to talk about tech stuff (or maybe..)

Anyway, maybe I start writing more random crap on this blog rather than trying to be too informative, which I have tried and failed so many times.

OK, see you next year!